
Reading blueprints can be tricky. There are so many dimensions, lines, and symbols! Even the simplest blueprints can look intimidating at first. In this article, we will give you a few basic tips to help you navigate through your blueprint, and show you a few ways we make the process easier on our homeowners and builders. Let’s start at the beginning (a very good place to start)…
Blueprints are plans drawn either by hand or on a computer that provide a wealth of information to contractors, as well as homeowners, regarding the construction of a home or other structure. The sizes and quantities of the building components, such as lumber, doors, and windows, are also included in blueprints. In other words, you can think of blueprints as your “Builder Bible” for constructing your home or other structure.
Start where you feel the most comfortable. Most of our customers have been researching home plans for quite some time, so a good place in this situation would be on the main floor plan of the home.
Once the finished blueprint is sent for review, you need to read everything on the set of blueprints. Luckily, this isn’t necessary at the beginning, and is only a full read one time. We use a more innovative way of communicating with our customers during the preliminary process, so just reviewing what is sent to you will be sufficient until the final plans are printed and sent.
Below is a list of items that are universal for almost all blueprints. You can think of this basic list as your blueprint reading guide, so feel free to refer back to this list as often as needed.
1. Rooms are labeled clearly by their function.
You will see rooms marked “Living Room,” “Master Bedroom,” “Bathroom,” etc. Our preliminary drawings also include room sizes for easy adjustment of living spaces.
2. Within each room, built-in items are clearly marked.
For example, in the bathroom, you will clearly see a symbol for a toilet:
Showers and baths will also be found easily by their symbols: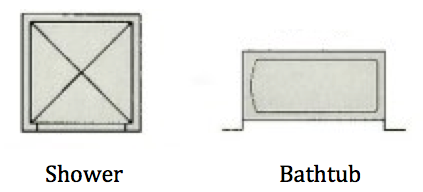
In rooms such as bedrooms, living rooms, kitchens, and dining rooms, beds, couches, tables, sinks, etc., may be included during the preliminary stages. Though these items help with planning spaces, they are typically NOT included in construction drawings used by builders, so your set may or may not have these included.
Being able to pinpoint the placement of interior walls will give you a better idea of the layout of your home. Understanding this from the beginning will allow you to make fewer changes to your plans and cut back on unnecessary expenses.
3. Doors and windows are represented in each wall. Doors are represented by a straight line, and the direction in which they open is clearly marked with a sloping line. For example, a single door will look like this:
A bi-fold door, often used for closets, will look like this:
Windows will look like rectangular boxes within the wall. Here are the symbols for both a double casement (top) and a single casement (bottom) window:
4. The scale of the blueprint will be noted in one of the lower corners, or on the bottom of each drawing. Scales are commonly ¼-inch, 1/8-inch, or ½-inch to a foot. The scale will be clearly notated on the plan. In addition, the entire blueprint will be drawn to the same scale, and will often only change for details, sections, and enlargements to show clarity.
5. Dimensions of both interior and exterior walls are noted in feet and inches. With some practice, you should be able to determine the length of your home, as well as the size of each room in your home. Here is an example: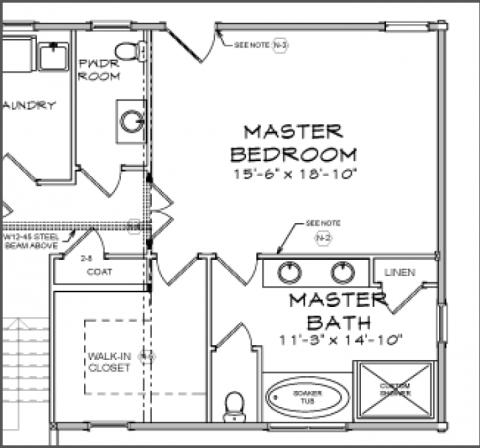
This little “snippet” shows you that the master bedroom is 15’-6” x 18’-10″. You can also see the rooms are clearly marked, along with the dimensions for each. This snippet will differ for the builders, and is usually shown similar to below.
Understanding how to read dimensions will allow you to get a better picture of your home as a finished product, and will also allow you to begin to plan the arrangement of your furniture in each room.
6. The elevations of the home, front, back, and sides, should be clearly marked. This may sound strange, but you would be surprised how many people, builders included, have looked at the front of the house and thought it was the back. This can cause obvious problems during the building process! These blueprints are called “Exterior Elevations,” and there will be a separate drawing of each of the four exterior walls of your home. Here is an example of an early elevation design: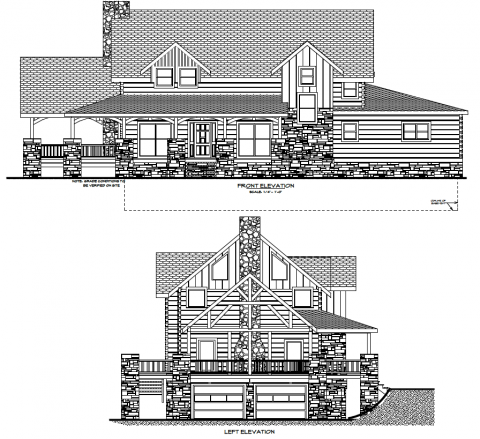
7. Sections, Details, and Enlargements are often used to show clarity.
Details are often included to make an area of the build easier to understand.
These tips are examples of items that are used in almost every blueprint. There will be exceptions to every rule, of course, but if you learn these seven basic ideas, you will be well on your way to reading your home’s plan. As with any skill, learning how to read blueprints takes practice and patience. However, it is a skill that is definitely worth learning, especially if you want to take an active role in the planning and construction of your dream home.
Are there any good resources for more free information on reading blueprints?
As with all areas of life, expanding your knowledge level by using more resources is always a good thing. Here are a few public domain resources that make a good starting place.
The US Navy has a great document, Blueprint Reading and Sketching. Though it is a bit outdated, it still does a great job of explaining the overall concept.
The US Army also has a great resource, especially the first few chapters of the Carpentry Field Manual.
Overview:
- Determine what you are looking at and how it should be viewed. Is it a floor plan, an elevation, or section/detail?
- Read and study each page of the plan. No, really… read them all and make sure you understand what they say.
- Read everything, even the boring stuff. Sometimes the little details stuck in a note on the 16th page can alter the entire project, so read it all… all of it. Really!
- Remember, questions are essential, and we love them. Make notes, ask questions, and understand what you are reading. If you need a helping hand along the way, please feel free to contact us. We will do our best to help.